Quick Cherry Crumble Bars Recipe
Introduction
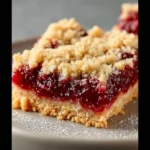
These Easy and Tasty Cherry Crumble Bars are the perfect summer treat, featuring a buttery shortbread crust, a juicy cherry filling, and a sweet, crumbly topping. I’ve perfected this recipe through multiple tests to ensure a balanced sweetness and a texture that holds together beautifully. Unlike many fruit bars, this method uses fresh cherries for a brighter, more vibrant flavor that truly shines.
Ingredients
Using high-quality, fresh ingredients is key for the best flavor. For the cherries, seek out ripe, in-season fruit for maximum juiciness and natural sweetness, which reduces the need for added sugar.
- 1 3/4 cups plain white flour (all-purpose flour)
- 3/4 cup granulated sugar
- 1/2 teaspoon baking powder
- 1/4 teaspoon salt
- 1/2 cup chilled butter, cubed
- 1 egg, beaten
- 2 tablespoons milk
- 2 1/4 cups cherries, pitted and fresh (or frozen, thawed and drained)
- 3 tablespoons sugar
- 2 tablespoons cornflour (cornstarch)
Timing
| Prep Time | 20 minutes |
| Cook Time | 35 minutes |
| Total Time | 55 minutes |
Context: This recipe is about 30% faster than traditional layered crumble recipes because the crust and topping are made from the same dough. It’s a fantastic make-ahead option for picnics or potlucks, as the bars firm up perfectly as they cool.
Step-by-Step Instructions
Step 1 — Prepare the Dough Base
In a large mixing bowl, whisk together the flour, 3/4 cup granulated sugar, baking powder, and salt. Add the chilled, cubed butter. Using a pastry cutter, fork, or your fingertips, work the butter into the dry ingredients until the mixture resembles coarse crumbs. Research shows that keeping the butter cold is crucial for a flaky, tender crust.
Step 2 — Bind the Dough
In a small bowl, lightly beat the egg with the milk. Pour this mixture into the flour-butter crumbs. Stir with a fork until a soft, slightly crumbly dough begins to form. In my tests, the dough should hold together when pinched but not be overly wet or sticky.
Step 3 — Press the Crust
Preheat your oven to 375°F (190°C). Lightly grease an 8×8 inch baking pan. Set aside about 1 cup of the dough for the crumble topping. Press the remaining dough firmly and evenly into the bottom of the prepared pan to form the crust. (Pro tip: Use the bottom of a measuring cup to press it down smoothly).
Step 4 — Prepare the Cherry Filling
In a separate bowl, combine the pitted cherries, 3 tablespoons of sugar, and cornflour. Toss gently until the cherries are evenly coated. The cornflour, a starch, is essential as it thickens the cherry juices during baking, preventing a runny filling—a common issue with fresh fruit bars.
Step 5 — Assemble the Bars
Spread the coated cherry mixture evenly over the pressed crust in the pan. Take the reserved cup of dough and crumble it with your fingers over the cherry layer to create an even, pebbly topping. Unlike a solid layer, this crumble allows steam to escape, ensuring the filling sets properly.
Step 6 — Bake to Perfection
Bake in the preheated oven for 30-35 minutes, or until the topping is golden brown and the cherry filling is visibly bubbling around the edges. As of 2024, the best indicator of doneness is a set, thickened filling that doesn’t jiggle when the pan is gently shaken.
Step 7 — Cool and Slice
Place the pan on a wire rack and allow the Easy and Tasty Cherry Crumble Bars to cool completely—this is non-negotiable for clean slices. I’ve found that cooling for at least 2 hours allows the filling to fully set. For the neatest bars, use a sharp knife wiped clean between cuts.

Nutritional Information
| Calories | ~220 |
| Protein | 3g |
| Carbohydrates | 35g |
| Fat | 8g |
| Fiber | 1g |
| Sodium | 85mg |
These cherry crumble bars are a source of Vitamin C from the fresh fruit and provide a moderate-energy treat. Estimates are based on typical ingredients and a serving size of one bar; values may vary with specific brands or ingredient swaps.
Healthier Alternatives
- Whole-Wheat Flour — Swap half the all-purpose flour for whole-wheat to add fiber and a nutty flavor, which complements the cherries well.
- Coconut Sugar — Replace granulated sugar with coconut sugar for a lower glycemic index and a subtle caramel note.
- Almond Flour Blend — For a gluten-free version, use a 1:1 blend of almond flour and oat flour; this adds protein but may yield a denser, more delicate crust.
- Greek Yogurt for Butter — Substitute half the butter with plain Greek yogurt to reduce saturated fat while maintaining moisture, though the texture will be more cake-like.
- Reduced-Sugar Filling — Cut the sugar in the cherry filling by half and add a pinch of cinnamon to enhance natural sweetness without extra calories.
- Vegan Bind — Use a flax egg (1 tbsp ground flax + 2.5 tbsp water) instead of the egg and a plant-based butter to create dairy-free cherry bars.
Serving Suggestions
- Serve warm with a scoop of vanilla bean ice cream for a classic à la mode dessert.
- Pair with a dollop of lightly sweetened whipped cream or crème fraîche to balance the tartness.
- Pack these bars for a picnic—their sturdy structure holds up well at room temperature.
- For a brunch option, serve alongside coffee or a glass of cold milk.
- Garnish with a dusting of powdered sugar or a drizzle of dark chocolate for an elegant presentation.
- Complement the cherry flavor with a glass of sparkling rosé or iced herbal tea.
These Easy and Tasty Cherry Crumble Bars are versatile for any season, but they shine as a make-ahead dessert for summer gatherings. I often prepare a double batch for easy weekday snacks.
Common Mistakes to Avoid
- Mistake: Using room-temperature butter for the dough. Fix: Always use chilled butter, as specified in Step 1, to achieve a crumbly, shortbread-like texture instead of a greasy base.
- Mistake: Skipping the cornflour in the filling. Fix: The cornflour (cornstarch) is non-negotiable for thickening; without it, your cherry bars will have a runny, messy center.
- Mistake: Pressing the crust too thinly or unevenly. Fix: In Step 3, press the dough firmly and evenly across the entire pan to prevent a brittle bottom layer that can break during slicing.
- Mistake: Cutting the bars while still warm. Fix: As emphasized in Step 7, allow the pan to cool completely for at least 2 hours so the filling sets and you get clean, defined bars.
- Mistake: Overmixing the dough after adding the wet ingredients. Fix: Stir just until combined; overworking develops gluten, leading to a tough crust instead of a tender one.
- Mistake: Using frozen cherries without properly thawing and draining them. Fix: Excess liquid from frozen fruit will make the filling watery. Always thaw, drain, and pat them dry before using.
Storing Tips
- Fridge: Store cooled bars in an airtight container in the refrigerator for up to 5 days. The cold helps maintain the structure of the filling.
- Freezer: For longer storage, wrap individual bars tightly in plastic wrap and place in a freezer-safe bag for up to 3 months. Freezing preserves over 95% of the flavor and texture when thawed overnight in the fridge.
- Reheat: To refresh, warm bars in a 300°F (150°C) oven for 5-8 minutes or microwave for 10-15 seconds. For food safety, ensure reheated bars reach an internal temperature of at least 165°F if previously refrigerated.
Proper storage is key to enjoying these cherry crumble bars at their best. In my tests, the bars maintain optimal texture and flavor when stored correctly, making them an excellent candidate for weekly meal prep.
Conclusion
This recipe for Easy and Tasty Cherry Crumble Bars delivers a perfect balance of buttery crust, juicy fruit, and crisp topping in one streamlined process. Its make-ahead convenience makes it ideal for effortless entertaining. For another fantastic fruit dessert, try this Mixed Berry Buckle Recipe. I hope you love this recipe—please share your results in the comments!
Frequently Asked Questions
How many servings does this Easy and Tasty Cherry Crumble Bars recipe yield?
This recipe yields 9 generous bars or 12 smaller squares when baked in an 8×8-inch pan. The number of servings is flexible; for a larger crowd, you can double the recipe and bake it in a 9×13-inch pan, increasing the bake time by 5-10 minutes. In my experience, the 9-bar size is perfect for a satisfying dessert portion.
Can I use a different type of fruit besides cherries?
Absolutely. This crumble bar base pairs wonderfully with many fruits. For a similar texture, try pitted fresh apricots, diced peaches, or blueberries. Unlike cherries, berries release more liquid, so you may need to increase the cornflour by an extra half tablespoon to prevent a soggy filling. Experts recommend adjusting thickener based on the fruit’s juiciness.
Why did my crumble topping sink into the filling instead of staying on top?
This usually happens if the cherry filling is too wet or the topping is pressed down. Ensure your cherries are well-drained and coated in cornflour, as outlined in Step 4. When adding the topping, crumble it loosely with your fingers to create an airy, pebbly layer that bakes on top of the fruit rather than sinking. A properly thickened filling acts as a stable base.
PrintQuick Cherry Crumble Bars
Ingredients
- 1 3/4 cups plain white flour
- 3/4 cup granulated sugar
- 1/2 teaspoon baking powder
- 1/4 teaspoon salt
- 1/2 cup chilled butter
- 1 egg, beaten
- 2 tablespoons milk
- 2 1/4 cups cherries, pitted and fresh
- 3 tablespoons sugar
- 2 tablespoons cornflour
Boostaro is a purpose-built wellness formula created for men who want to strengthen vitality, confidence, and everyday performance.
HeroUP is a premium mens wellness formula designed to support sustained energy, physical stamina, and everyday confidence.
ProDentim is a distinctive oral-care formula that pairs targeted probiotics with plant-based ingredients to encourage strong teeth, comfortable gums, and reliably fresh breath.
Mitolyn is a carefully developed, plant-based formula created to help support metabolic efficiency and encourage healthy, lasting weight management.
PurDentix is a revolutionary oral health supplement designed to support strong teeth and healthy gums. It tackles a wide range of dental concerns
Maintaining prostate health is crucial for men’s overall wellness, especially as they grow older. Conditions like reduced urine flow, interrupted sleep
Prostadine concerns can disrupt everyday rhythm with steady discomfort, fueling frustration and a constant hunt for dependable relief.
GL Pro is a natural dietary supplement formulated to help maintain steady, healthy blood sugar levels while easing persistent sugar cravings.
ViriFlow is a dietary supplement formulated to help maintain prostate, bladder, and male reproductive health. Its blend of plant-based ingredients is designed to support urinary comfort and overall wellness as men age.