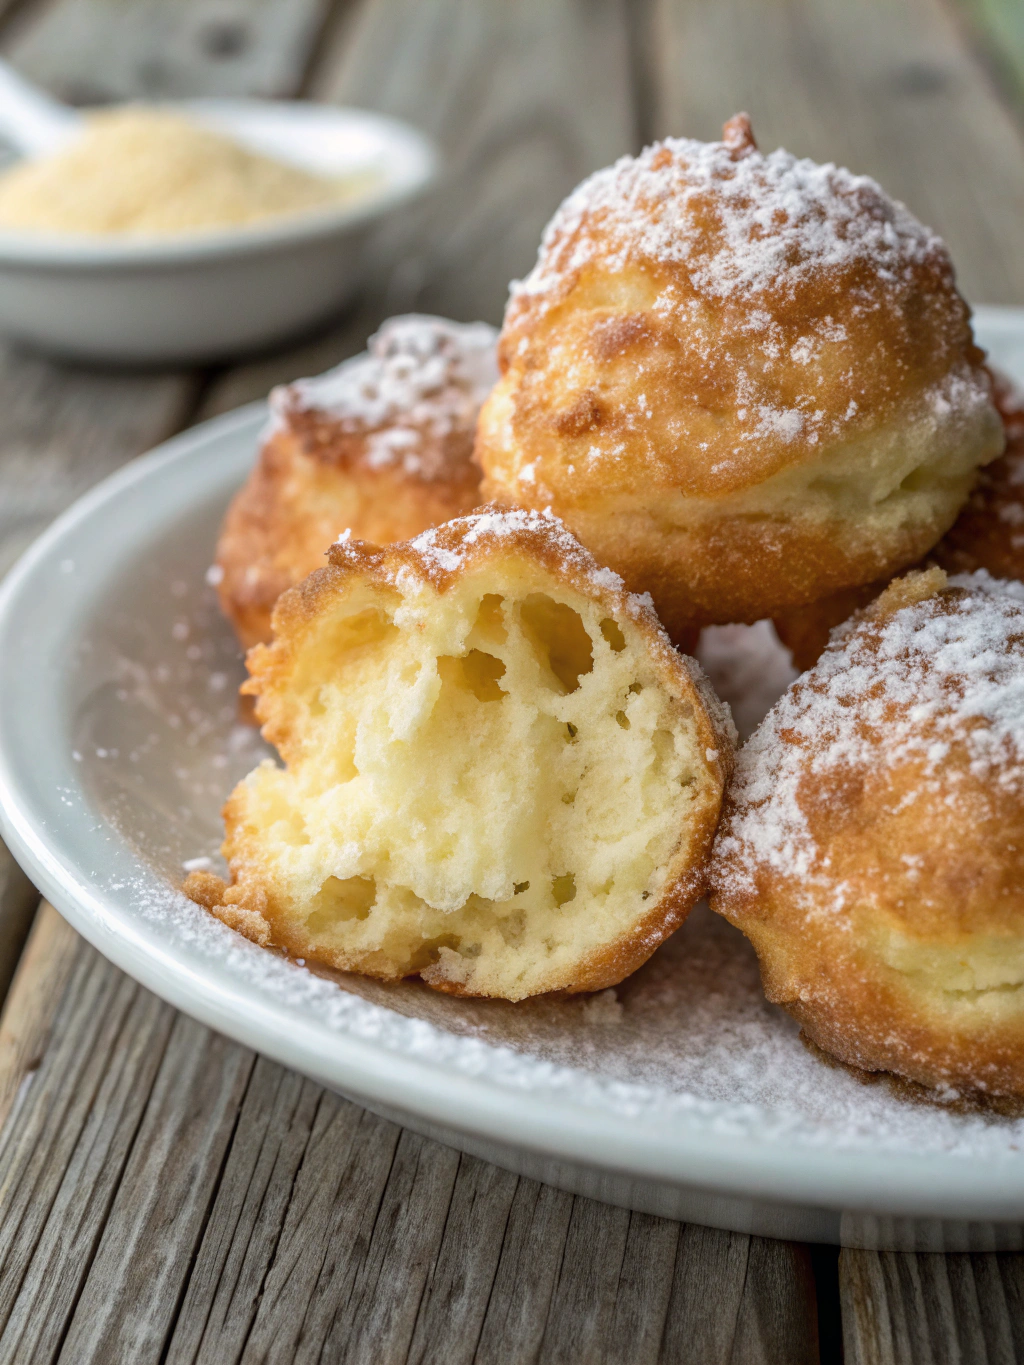
Classic Nuns Puffs – Easy French Pastry Recipe
There’s something magical about recipes that have stood the test of time—dishes that whisper stories of generations past while still finding a place in our modern kitchens. “Nuns Puffs,” or Pet de Nonne as they’re charmingly called in French, are one of those treasures. Light as air, golden-crisp on the outside, and tender within, these little puffs are said to have been created in convents centuries ago. The first time I made them, I was struck by how something so simple—just a handful of pantry staples—could transform into such delicate, cloud-like bites. Whether you’re serving them for a quiet afternoon tea or a festive brunch, they carry a warmth that feels like a hug from history.
Ingredients You’ll Need
Gather these humble ingredients, and let’s create a little magic together:
- 1 cup water – The base of our dough, so use filtered if your tap water has a strong taste.
- ½ cup unsalted butter – Richness and flavor! If using salted butter, just skip the added salt later.
- ¼ teaspoon salt – A pinch to balance the sweetness.
- 1 cup all-purpose flour – Spoon and level it for accuracy—no packed flour here.
- 4 large eggs – Room temperature eggs blend more smoothly into the dough.
- Powdered sugar – For that snowy, elegant finish.
Optional but lovely: A scrape of vanilla bean or a dash of cinnamon in the dough for a subtle warmth.
Step-by-Step: Making Nuns Puffs
Don’t let the French name intimidate you—these are wonderfully simple to make. Here’s how:
- Preheat and prepare: Heat your oven to 375°F (190°C) and line a baking sheet with parchment. This is key—no sticking!
- Cook the dough base: In a saucepan, bring the water, butter, and salt to a rolling boil. Reduce the heat to low, add the flour all at once, and stir vigorously with a wooden spoon until the mixture forms a smooth ball that pulls away from the pan (about 1–2 minutes).
- Cool slightly: Transfer the dough to a mixing bowl and let it cool for 5 minutes—this prevents scrambling the eggs.
- Add the eggs: One at a time, beat each egg into the dough until fully incorporated. The dough will go from slippery to glossy and thick. Pro tip: If it feels too stiff, add a tablespoon of water to loosen it.
- Pipe or spoon: Using two spoons or a piping bag, dollop walnut-sized mounds onto the baking sheet, spacing them 2 inches apart. They’ll puff dramatically!
- Bake to golden perfection: 25–30 minutes, until deeply golden and hollow-sounding when tapped. Resist opening the oven early—they need steady heat to rise properly.
- Dust and devour: Let them cool just enough to handle, then shower with powdered sugar. Serve warm for maximum joy.
Pro Tips, Variations, and Substitutions
Making Nuns Puffs is a delightful experience, but a few expert tricks can elevate them even further. For extra fluffy puffs, ensure your milk mixture is hot but not boiling when adding the flour—this helps create the perfect dough consistency. If you prefer a richer flavor, substitute half the milk with heavy cream or add a teaspoon of vanilla extract to the batter.
- Cheesy Twist: Fold in ½ cup of grated Gruyère or Parmesan for a savory version.
- Sweet Upgrade: Dust finished puffs with powdered sugar or drizzle with honey.
- Gluten-Free: Use a 1:1 gluten-free flour blend in place of all-purpose flour.
- Dairy-Free: Swap the milk for almond or oat milk and use a plant-based butter alternative.
What to Serve With Nuns Puffs
These airy, golden puffs are incredibly versatile. Serve them warm for breakfast with a dollop of jam or a side of fresh fruit. For an elegant brunch, pair them with a fruit compote or a light citrus curd. If you’ve made a savory version, they’re perfect alongside a creamy soup or a crisp salad. A cup of tea or coffee completes the experience beautifully!
Storage and Reheating Tips
Nuns Puffs are best enjoyed fresh, but if you have leftovers, store them in an airtight container at room temperature for up to two days. To revive their crispness, pop them in a 350°F oven for 5–7 minutes. Avoid microwaving, as it can make them soggy. For longer storage, freeze the baked puffs in a sealed bag and reheat in the oven straight from frozen—just add a couple extra minutes.
Frequently Asked Questions
Can I make Nuns Puffs ahead of time?
Yes! Prepare the batter up to a day in advance and keep it refrigerated. Let it come to room temperature before baking for the best rise.
Why didn’t my puffs rise properly?
This usually happens if the dough wasn’t mixed thoroughly or the oven temperature was too low. Make sure your batter is smooth and your oven is fully preheated.
Can I use a muffin tin instead of a baking sheet?
Absolutely! A greased muffin tin will help the puffs hold their shape, though they may not spread as freely.
Are Nuns Puffs the same as cream puffs?
Not quite! While both are light and airy, Nuns Puffs are made with a simpler dough (no eggs) and have a slightly denser, custard-like interior.
Final Thoughts
There’s something truly magical about pulling a tray of golden Nuns Puffs from the oven—their delicate crispness giving way to a tender, almost melt-in-your-mouth center. Whether you enjoy them as a sweet morning treat or a savory snack, these little bites carry a warmth and simplicity that feels like a hug from the kitchen. I hope this recipe brings as much joy to your home as it has to mine. Happy baking!
PrintNuns Puffs
Light and airy pastry puffs that puff up dramatically in the oven, perfect for breakfast or tea time.
Ingredients
For the Crust:
- 1/2 cup unsalted butter
- 1 cup water
- 1 cup all-purpose flour
- 4 large eggs
- 1/4 teaspoon salt
- 1 tablespoon granulated sugar
Instructions
1. Prepare the Crust:
- Preheat oven to 375°F (190°C) and grease a muffin tin.
- In a saucepan, bring butter and water to a boil over medium heat.
- Remove from heat and quickly stir in flour, salt, and sugar until a smooth dough forms.
- Return to low heat and cook, stirring constantly, for 1-2 minutes until dough pulls away from the sides.
- Remove from heat and let cool slightly. Beat in eggs one at a time until fully incorporated and dough is glossy.
- Spoon dough into prepared muffin tin, filling each cup about 2/3 full.
- Bake for 25-30 minutes until puffed and golden brown. Do not open oven during baking.
- Remove from oven and let cool slightly before serving.
Notes
You can customize the seasonings to taste.