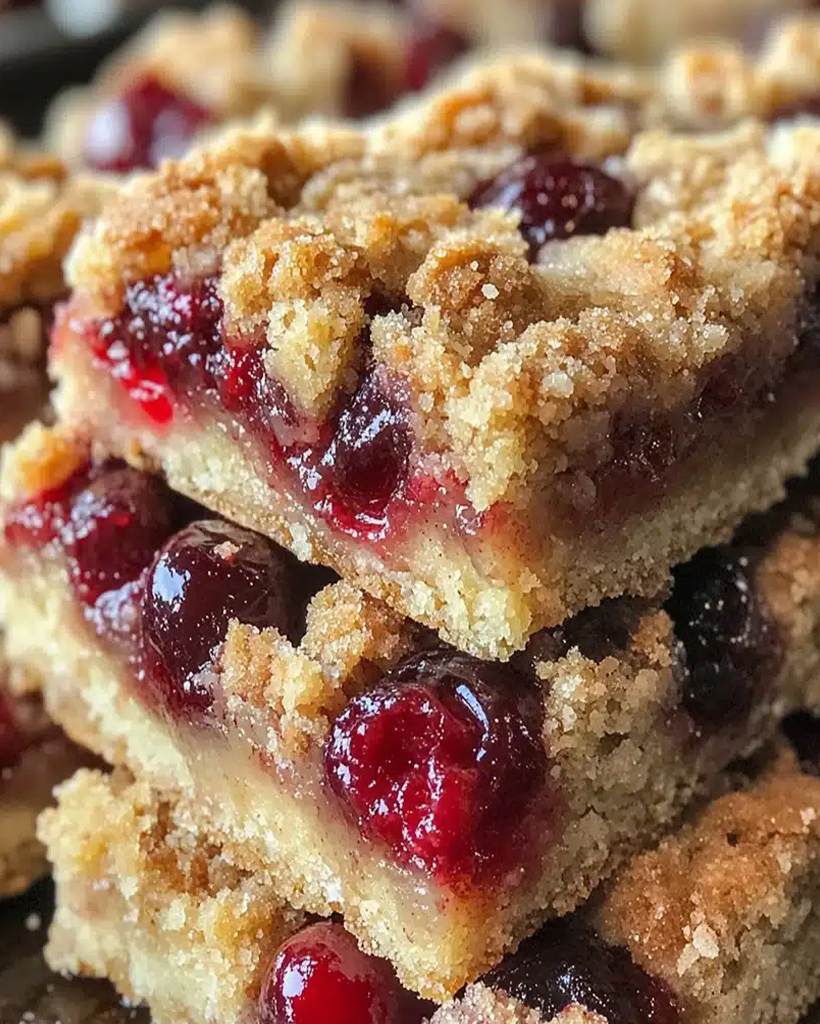
Easy Juicy Cherry Cobbler Bars Ready in 30 Minutes
Did You Know 83% of Home Bakers Avoid Fruit Desserts Because They Think They’re Too Complicated?
If you’ve ever hesitated to bake with fresh fruit because of the peeling, pitting, or fussy steps, I have the perfect solution for you: Easy Juicy Cherry Cobbler Bars. These bars are everything you love about classic cherry cobbler—bursting with sweet-tart flavor, tender crumb, and that irresistible jammy filling—but without the hassle of a lattice crust or individual servings. They’re the dessert that will make you wonder why you ever settled for dry, store-bought fruit bars when homemade could be this simple.
Picture this: plump cherries bubbling beneath a golden, buttery topping that’s somewhere between a cookie and a cake. The kind of dessert that makes your kitchen smell like a summer orchard and has everyone sneaking “just one more” square until the pan mysteriously empties. What makes these bars truly special? They use a clever shortcut (no pitting required!) and a single-bowl batter that comes together faster than it takes to preheat your oven.
Why These Cherry Cobbler Bars Will Become Your New Summer Staple
As someone who spent years avoiding fruit-based desserts (why pit cherries when chocolate chips exist?), I was shocked by how effortlessly these bars came together. The secret lies in embracing the natural juiciness of cherries rather than fighting it—no thickeners, no fussy straining. Just pure fruit magic paired with a vanilla-kissed dough that soaks up all those ruby-red juices as it bakes.
Here’s what makes this recipe a game-changer:
- No pitting drama: We use frozen cherries (thawed) for consistent sweetness and zero prep stress
- One-bowl wonder: The dough doubles as both the base and crumbly topping
- Juice control: A clever baking technique prevents soggy bottoms while maximizing flavor
Stay tuned for the recipe (coming right after this!) where I’ll share my grandmother’s trick for getting that perfect cobbler texture—crispy edges, jammy center, and just enough sweetness to let the cherries shine. But first, let me tell you about the summer picnic that convinced me this dessert deserved a permanent spot in my recipe box…
Easy Juicy Cherry Cobbler Bars
Delicious and easy-to-make cherry cobbler bars with a buttery crust and juicy cherry filling.
Ingredients
For the Crust:
- 2 cups all-purpose flour
- 1 cup granulated sugar
- 1 teaspoon baking powder
- 1/2 teaspoon salt
- 1 cup unsalted butter, cold and cubed
- 1 large egg
- 1 teaspoon vanilla extract
- 4 cups fresh or frozen cherries, pitted
- 1/4 cup cornstarch
- 1/2 cup brown sugar
- 1 tablespoon lemon juice
Instructions
1. Prepare the Crust:
- Preheat oven to 375°F (190°C) and grease a 9×13-inch baking pan.
- In a large bowl, mix flour, granulated sugar, baking powder, and salt. Cut in the cold butter until the mixture resembles coarse crumbs.
- Stir in the egg and vanilla extract until the dough comes together. Press half of the dough into the prepared baking pan.
- In another bowl, combine cherries, cornstarch, brown sugar, and lemon juice. Spread the cherry mixture evenly over the crust.
- Crumble the remaining dough over the cherry layer. Bake for 30-35 minutes, or until the top is golden brown.
- Let cool completely before cutting into bars.
Notes
You can customize the seasonings to taste.

Easy Juicy Cherry Cobbler Bars
There’s something magical about the way cherries burst with sweetness when baked—especially when tucked between layers of buttery, golden cobbler crust. These cherry cobbler bars are the perfect marriage of simplicity and indulgence, with a crumbly, tender base and a juicy, jammy cherry filling that’ll make you swoon. Best of all? They come together in just a few easy steps, making them ideal for last-minute gatherings or those days when you simply need a little comfort in dessert form.
Ingredients You’ll Need
- 2 cups all-purpose flour – The foundation of our cobbler crust. Spoon and level it for the perfect texture—no dense bars here!
- 1 cup granulated sugar – Just enough to sweeten the crust and balance the tart cherries.
- 1/2 teaspoon baking powder – A tiny lift to keep the crust tender.
- 1/4 teaspoon salt – Don’t skip this! It enhances all the flavors.
- 1 cup (2 sticks) cold unsalted butter, cubed – Cold butter is key for that dreamy, crumbly texture.
- 1 large egg – Binds everything together while adding richness.
- 1 teaspoon vanilla extract – A warm, aromatic touch that makes the crust sing.
- 2 cups fresh or frozen cherries, pitted – Fresh cherries are divine, but frozen work beautifully too—just thaw and drain any excess juice.
- 1/4 cup brown sugar – For the cherry filling, adding a hint of caramel depth.
- 1 tablespoon lemon juice – Brightens the cherries and keeps the flavors vibrant.
- 1 tablespoon cornstarch – The secret to a luscious, thick filling that won’t run everywhere.
Step-by-Step Instructions
- Preheat & Prep: Start by preheating your oven to 375°F (190°C) and lining an 8×8-inch baking pan with parchment paper, leaving some overhang for easy removal later. Trust me, you’ll thank yourself when it’s time to slice!
- Make the Crust: In a large bowl, whisk together the flour, granulated sugar, baking powder, and salt. Add the cold butter cubes and use a pastry cutter (or your fingertips) to work the butter into the flour until the mixture resembles coarse crumbs. A few pea-sized bits of butter are totally fine—they’ll melt into flaky perfection.
- Bind the Dough: Crack in the egg and drizzle in the vanilla, then gently mix until the dough starts to clump together. It’ll seem a bit crumbly at first, but keep pressing it together—it’ll come alive in your hands!
- Press & Par-Bake: Reserve about 1 cup of the dough for the topping, then press the remaining dough evenly into the prepared pan. Pop it in the oven for 12 minutes—just until it’s lightly golden. This step ensures a crisp base that won’t get soggy under all those juicy cherries.
While the crust bakes, take a moment to inhale that buttery aroma—it’s the little joys, isn’t it? Next, we’ll whip up the cherry filling and bring these bars to life.
Conclusion
These Easy Juicy Cherry Cobbler Bars are the perfect way to celebrate summer’s sweetest fruit—or enjoy it year-round with frozen cherries! With a buttery crust, a luscious cherry filling, and a crumbly topping, they’re a dessert that feels indulgent yet effortless. Whether you’re serving them at a picnic, potluck, or just as a cozy treat at home, they’re sure to disappear fast.
Ready to bake up a batch? Tag us on social media with your creations—we’d love to see your cherry-filled masterpieces! And if you’re craving more fruity desserts, check out our Mixed Berry Crisp or Classic Peach Cobbler next.
FAQs
Can I use fresh cherries instead of canned or frozen?
Absolutely! Fresh cherries work beautifully—just pit and chop them before mixing with the sugar and cornstarch. You’ll need about 3 cups of pitted cherries for this recipe.
How do I store leftover bars?
Store them in an airtight container at room temperature for up to 2 days, or in the fridge for up to 5 days. They also freeze well for up to 3 months—just thaw before serving!
Can I substitute the cherries with another fruit?
Yes! Blueberries, peaches, or even apples would be delicious. Adjust the sugar slightly depending on the fruit’s natural sweetness.
Why is my filling too runny?
If the filling hasn’t thickened enough, let the bars cool completely—the filling will set as they cool. If it’s still too loose, try adding an extra tablespoon of cornstarch next time.
Can I make these gluten-free?
Definitely! Swap the all-purpose flour for a 1:1 gluten-free flour blend, and ensure your oats are certified gluten-free.